- in Video
- |
- 2 comments
How To Get Good Lighting For Video

Remember, the most important things, when creating your video are as follows, in order of importance, number one, your content, number two, your audio, number three, your lighting and number four, an HD camera. With good lighting, you can make any camera, smartphone or HD webcam footage look great, if they shoot in 1080 HD, they can even compete with higher-end DSLRs, I’m not saying that they are better per se, but that your content, audio and lighting will far outperform a DSLR, that hasn’t got these other parts in place.
Listen/Subscribe to the Podcast…
In this ‘Getting Started With Video Series’, I address the biggest concerns my audience have with using video in their business. ‘How To Get Good Lighting For Video’ is the third of these.
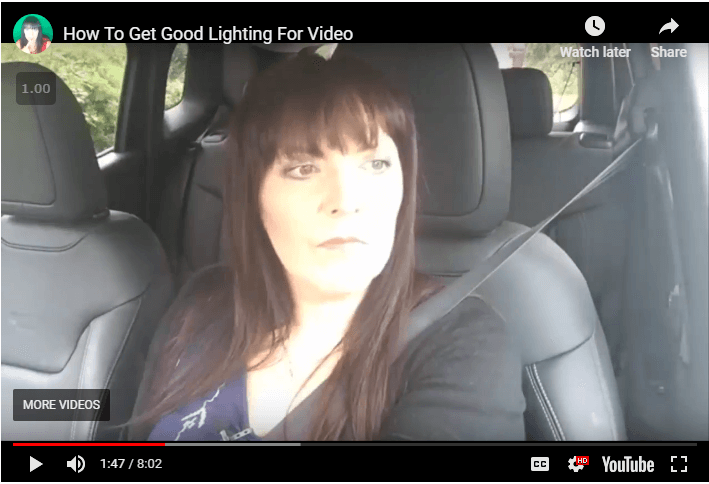
When getting started with your lighting, don’t over complicate things, natural light is fantastic and, of course, it’s completely free, it can be very flattering and give a lovely soft light. You really have to be careful when the sun is strong though, here is a screenshot of some footage I took in my car, my iPhone is on a sticky mount on the windscreen.

Now some parts of this video footage are fine, but you can see that the bright sun can also make me look overexposed and this is the only problem with natural light, you can’t control it, you’re at its mercy. When filming outside, try to film in the early morning or in the late afternoon, when the sun is low in the sky. If the sun is high in the sky and strong, if it’s in front of you, you will squint or need sunglasses, which is not ideal, if it’s behind you, you’ll look like a dark silhouette.
When filming inside, sit facing a window, if you have the window behind you as your only light, you will again just look like a silhouette. You can use a reflector to bounce the light at any areas that tend to have a shadow, they’re not expensive and you can get different covers for them, like silver for a cool light or gold for a warmer glow, this is definitely worth looking at, if you’re having a problem with shadows.
I like to film outside occasionally, but for the most part, I film indoors with controlled lighting. So for my lighting setup, I mainly use an 18″ ring light, quite an expensive purchase, a couple of years back for me, I had it imported from the US from Stellar Lighting Systems, however there are now quite a few alternatives on Amazon. This light can be used on its own and it’s reasonably portable with its own carry case, so it’s possible to use this if you travel a lot, for the most part though, I use it along with two one-bulb softbox lights, which are placed to the sides at around a 45 degree angle, this prevents the front light casting a shadow of me onto the background behind.
The ring light is dimmable and has a diffuser on it for soft, flattering, controllable lighting. Softbox lights are very flattering too, they are cheap and you can get away with just a pair of these, I have two single-bulb, these are the ones I usually use and two four-bulb lights, the four-bulb lights are great, if you need the extra brightness. I use these to get the super bright, Apple white background look, the white background is lit up by these with all four bulbs on, the other two softboxes are then used to light the subject, i.e. me.
The main drawback to softbox lights is the size of them, mine are also easily knocked over, being rather top-heavy, although I still love them.
Three-point lighting, if you search for advice on lighting, you will find that the standard or traditional method is to use three-point lighting, I have never actually used this method, I took advice from some YouTuber’s, who did beauty lighting and it always looked better to me. It (3 point lighting) involves one main light called a key light, this is the brightest light or you could put it the closest to the subject, one fill light, which is not so powerful and is used to counteract any shadows from the main light, and one back light, I’ve seen some use the back light high up like a hair light and I’ve also seen it used lower down behind the subject, which creates a glow and depth, separating the subject from the background behind. I want to try this back light one of the days out of interest.
DIY lighting, there are lots of options for creating your own lighting setup and these can be great, just do a search on YouTube and you’ll see many solutions for cheap DIY lighting. For me, I felt the softbox kits were cheap enough and I had the room for them, the bulbs are 80 Watt/5500 Kelvin, which means they are daylight bulbs. Remember, the aim is to have a nice, bright, even lighting with no shadows.
I do have a LuMee case and mini ring light and these are okay for helping with light on the move with your smartphone, they are not too bad, better than nothing, but not really professional as such. Talking of professional lighting, you can buy some seriously expensive and bright LED lights, I don’t really have a need for these at the moment, I’m happy with what I have, if I do progress to use any of these, I will of course be sure to let you know.
Now remember, the most important thing is to get started.I’d love to hear what you think, so please do leave a comment and let me know and if you’d like to grab my free report listing all of the video equipment that I use, please visit MichelleEaton.com/video. Thanks for listening and I’ll catch you next time.